This tutorial is about building a simple “Hello world” application for Android Ice Cream Sandwich using Eclipse under Windows.
Prerequisites
I am using Windows 7 x64 but you can use any other version of Windows.
Below a list of softwares needed to create and setup the development environment for android programming:
- Eclipse IDE.
- Java Development Kit.
- Android SDK Tools.
When writing this paper, I used Eclipse Classic v3.7.1, Java SE Development Kit 7u1 and Android SDK Tools – Revision 15.
Installation and configuration
I recommend the following installation order:
1. Download and install the Java Development Kit from here.
2. Download the Android SDK Tools Windows installer (.exe file) from here and run the executable.
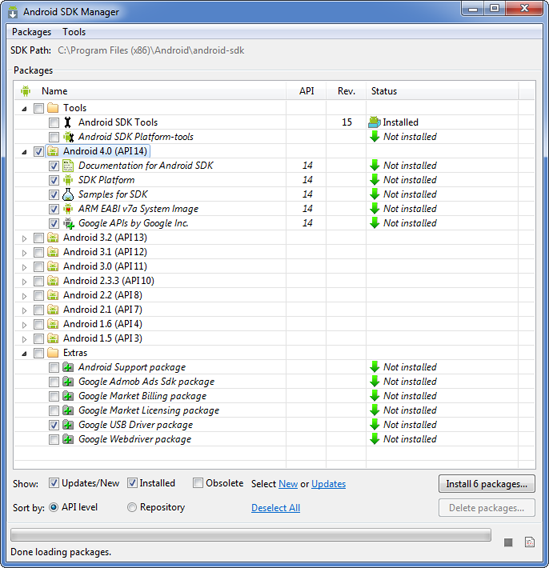
At the end of the install, make sure to select the option Start SDK Manager (to download system images, etc.) then click Finish to start the Android SDK Manager as shown below:
By default Android Ice Cream Sandwich stuff is selected. Just click the Install 6 packages… button. A new window will open that will ask you to confirm the packages to install. Click on Accept All then Install button.
The components will download and install automatically. This will take some time so be patient.
My Android SDK installation path is C:\Program Files (x86)\Android\android-sdk.
3. Download the Eclipse IDE from here. Unzip the downloaded file in a folder of your choice. The IDE executable is called eclipse.exe.
4. Install Eclipse Android Development tools (ADT).
The ADT is s a plugin for the Eclipse IDE that is designed to give you a powerful, integrated environment in which to build Android applications.
– Run Eclipse and choose Help > Install New Software.
– Click Add in the Available Software window.
– Enter ADT Plugin in the Name field, and https://dl-ssl.google.com/android/eclipse/ in the Location field.
– Click OK. You may need to wait a little until the list of available softwares get updated.
– Check Developer Tools. This will install the Android Development Tools and DDMS, Android’s debugging tool.
– Click Next and Finish to install the plugin.
You’ll need to restart Eclipse once everything is installed. If asked about the Android SDK path then provide the one used in point 2. An alternate way is to go to preferences, find Android on the sidebar and then there will be a box for Android SDK location.
5. Create an Android Virtual Device (AVD).
An AVD is an Android Phone emulator that can be used to test your applications without having a physical Android Phone.
– Run your Eclipse IDE then click on Window > AVD Manager then New.
– In the Android Virtual Device Manager window click New.
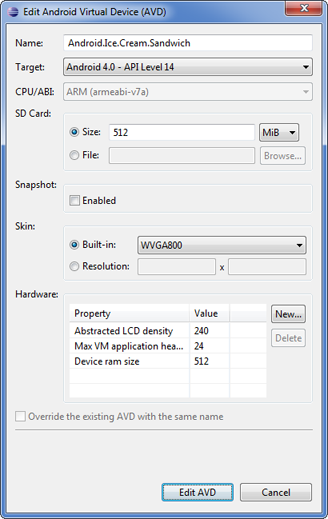
– The Create new Android Virtual Device (AVD) dialog appears.
– Fill in the details for the AVD: Give it a name, a platform target (Andoid 4.0 – API Level 14 in our case).
Building the application
1. Create a new Android project.
From Eclipse open File > New. In the New Project window, select Android Application and enter Hello World as a project name.
Also set your project properties as:
Build Target: Select Android 4.0
Application Name: Hello World
Package Name: com.android.briolidz.helloworld
Create Activity: HelloWorldActivity
2. Simple code customization.
Open src > com.android.briolidz.helloworld > HelloWorldActivity.java
Replace the following code:
setContentView(R.layout.main);
With the code given below:
TextView textView = new TextView(this);
textView.setText("Hello World!");
setContentView(textView);
3. Run the application.
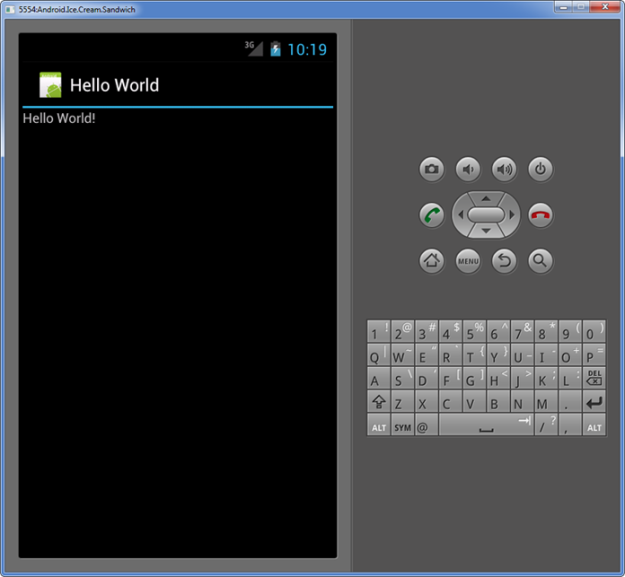
Run the application by selecting Run > Run. In the Run As dialog select Android Application (An alternate way is to right click the project name then select Run As > Android Application).
Tip: In case you are getting errors, you need to import the missing java packages. To do so, press Ctrl-Shift-O. This is an Eclipse shortcut that identifies missing packages based on your code and adds them for you.
Note that the Android emulator might take several minutes to load.


