Tag Archives: I9505

Samsung Galaxy S4 I9505: Pre-Rooted KNOX-Free TouchWiz ROM

This guide is intended for people looking for a KNOX-free TouchWiz experience using the Echoe SLIM custom ROM. This ROM brings several features such as:

  • Custom Kernel (fast and battery friendly).
  • No KNOX bootloader.
  • Pre-Rooted, zipaligned and deodexed.
  • Debloated (small storage size and reduced memory usage).
  • Lots of tweaks …

The TWRP custom recovery will be used to flash the ROM zip file on your device. This guide is tested with Echoe SLIM v9. Feel free to upgrade to the latest version.

Do not try this on any other models of the Galaxy S4 or you will end up bricking your device. Use it at your own risk.

Prerequisites

– Make a backup of all your important data before following this guide. All data on your device will be deleted and your custom recovery will be overwritten.
– Ensure the battery of the phone is charged more than 80%.
– Download Echoe SLIM v9 (Based on Samsung 4.3 I9505XXUEMK8 firmware).
– Download I9505_XXUEMK8_MODEM.rar.
– Download openrecovery-twrp-2.6.3.1-jfltexx.tar.
– Download Odin v3.09.
– Download Samsung Galaxy S4 USB drivers.
– Windows 7 x64.

If you already installed KNOX bootloader (found in Samsung 4.3 stock firmware and higher) then you should know that the latter verifies signatures of loaded kernels and recoveries. As a result, no custom ones can be installed without voiding the KNOX warranty. Actually, there is no known way to reset this warranty flag. Do not continue if you want to keep your warranty with your KNOX enabled firmware/bootloader.

Flashing the Echoe custom ROM does not modify your already installed bootloader and modem making this ROM of big interest.

Preliminary Setup

– Install the Samsung Galaxy S4 USB drivers.

Note that the Samsung Kies also installs the USB drivers. However, Kies is known to cause problems when Odin is attempting to communicate with your device, so ensure it is really closed (use Windows Task Manager to kill it and its related processes if you need to).

– Enable USB debugging mode on the device (Go to Settings -> More tab -> Developer options, then check box in front of USB debugging).

If Developer option is not shown by default then do:

  • Go to Settings, tap More tab then navigate to the bottom and select About.
  • Scroll down and tap Build number several times until you see a message that says Developer mode has been enabled.
  • Go back and you should see the Developer options menu appear under System manager.
  • Select Developer options then tap the check box in front of USB debugging.

Install TWRP recovery

– Download openrecovery-twrp-2.6.3.1-jfltexx.tar.

– Follow my previous article called Install TWRP Recovery on Samsung Galaxy S4 I9505 to install this custom recovery.

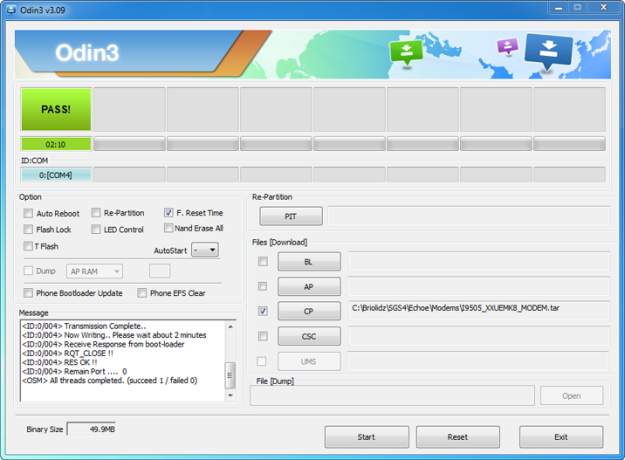
I recommend using Odin v3.09. The UI changes compared to previous versions are as follows:

  • The new field AutoStart is by default set to ““.
  • The Bootloader, PDA, and PHONE buttons are renamed to BL, AP, and CP.

Flash the Echoe ROM

– Download Echoe SLIM v9 custom ROM as a zip file.

– Connect your device to your PC with the Samsung USB Cable.

– Copy the downloaded ROM zip file to your external SD card root folder (IMPORTANT).

– Turn off your device and disconnect from the USB cable.

– Boot into TWRP Recovery Mode. Press and hold Volume up + Power + Home buttons simultaneously. After appearing Samsung logo release the buttons.

Wipe standard partitions (highly recommended before installing any custom ROM):

  • Once in TWRP recovery, choose Wipe then tap Advanced Wipe.
  • Check Dalvick cache, system, Data, Internal Storage and cache.
  • Slide Swipe to wipe.

– Return to main menu then choose Install.

– Select the ROM zip file from external card root folder. Uncheck zip file signature verification then slide Swipe to confirm flash. The installation procedure starts now.

– Return to main menu, choose Reboot then select System. You device will take several minutes to boot the first time.

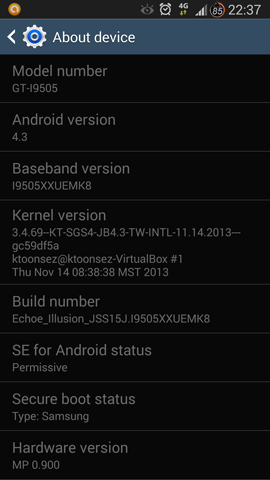
– Open Settings, select More tab then choose About phone to verify that you successfully installed the Echoe custom ROM (see screenshot of the final result at the end of this guide).

Wi-Fi always on

If the Wi-Fi turns off automatically when you put the device to sleep, then you can tweak the settings to keep it awake always:

  • Tap Settings from the home screen.
  • Open Connections tab then select Wi-Fi .
  • From the menu button select Advanced.
  • Set Keep Wi-Fi on during sleep to Always.

Flash the modem

If your modem is working fine you don’t need to flash it. The modem doesn’t have to match the firmware base. Flashing the modem is highly recommended in the following situations:

  • No mobile data traffic after screen off.
  • Jump from an older Android version.

Below the procedure to install the XXUEMK8 modem that matches the Samsung 4.3 I9505XXUEMK8 firmware (You can use the same procedure to install another modem).

– Download I9505_XXUEMK8_MODEM.rar. Use your favorite tool to extract the I9505_XXUEMK8_MODEM.tar file (I recommend 7-zip).

– Run Odin v3.09 as administrator.

  • UnCheck Auto Reboot.
  • Check F. Reset Time.
  • Make sure that the re-partition checkbox is not selected.
  • Click CP then load I9505_XXUEMK8_MODEM.tar.

– Power off the device (IMPORTANT).

– Set your device in Download mode:

  • Press and hold Volume Down + Power + Home buttons simultaneously. Release the buttons only when the Warning!! message appears.
  • Press Volume Up button to enter into Download mode.

– Connect your device to your PC with the Samsung USB Cable. Odin should now recognize the device and the ID:COM field should turn yellow. This means that it has detected your device without a problem.

– Click Start. Wait a couple of minutes until the following conditions are met:

  • The ID:COM box turns green and says PASS!.
  • The log box displays all threads completed.

– The flashing operation is complete. Exit Odin and unplug the USB cable.

– Hold Power button for 10 seconds till phone resets (you feel the vibration).

ModemMK8

Below a copy of Odin’s log box content:

<ID:0/004> Added!!
<ID:0/004> Odin v.3 engine (ID:4)..
<ID:0/004> File analysis..
<ID:0/004> SetupConnection..
<ID:0/004> Initialzation..
<ID:0/004> Get PIT for mapping..
<ID:0/004> Firmware update start..
<ID:0/004> SingleDownload.
<ID:0/004> modem.bin
<ID:0/004> NAND Write Start!!
<ID:0/004> Transmission Complete..
<ID:0/004> Now Writing.. Please wait about 2 minutes
<ID:0/004> Receive Response from boot-loader
<ID:0/004> RQT_CLOSE !!
<ID:0/004> RES OK !!
<ID:0/004> Remain Port ....  0
<OSM> All threads completed. (succeed 1 / failed 0)

Final result

Below a screenshot of my device About device main content:
AboutDevice-EchoeSLIMv9

Samsung Galaxy S4 I9505: Unroot and restore to stock ROM

There are several reasons to restore a Samsung Galaxy S4 back to official stock firmware. The main reasons are:

  • Unroot and receive OTA updates again.
  • Resurrect/unbrick the device.
  • Reclaim the manufacturer warranty.

This guide is intended only for the I9505 international version of the Galaxy S4 to flash I9505XXUBMEA – XEF 4.2.2 Jelly Bean stock Samsung firmware. Do not try this on any other models of the Galaxy S4 or you will end up bricking your device. Use it at your own risk.

Prerequisites

– Make a backup of all your important data before following this guide. All data on your device will be deleted and your custom recovery will be overwritten.
– Ensure the battery of the phone is charged more than 80%.
– Download I9505XXUBMEA_I9505OXXBMF1_XEF.zip stock Samsung 4.2.2 Jelly Bean firmware.
– Download Odin v3.07.
– Download Samsung Galaxy S4 USB drivers.
– Windows 7 x64.

Procedure

– Install the Samsung Galaxy S4 USB drivers.

Note that the Samsung Kies also installs the USB drivers. However, Kies is known to cause problems when Odin is attempting to communicate with your device, so ensure it is really closed (use Windows Task Manager to kill it and its related processes if you need to).

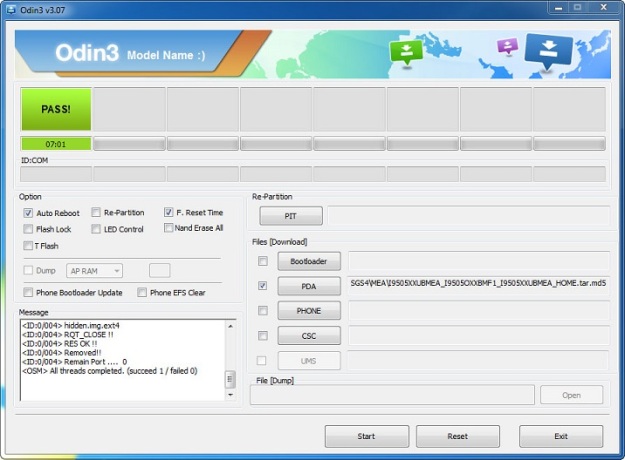
– Unzip I9505XXUBMEA_I9505OXXBMF1_XEF.zip to a folder of your choice. The file I9505XXUBMEA_I9505OXXBMF1_I9505XXUBMEA_HOME.tar.md5 is a stock Samsung firmware and has the following settings:

Model: GT-I9505
Country: France
Version: Android 4.2.2
Changelist: 768421
Build date: Wed, 29 May 2013 16:05:23 +0000
Product Code: XEF
PDA: I9505XXUBMEA
CSC: I9505OXXBMF1
MODEM: I9505XXUBMEA

– Run Odin v3.07 as administrator:

  • Check Auto Reboot and F. Reset Time.
  • Make sure that the re-partition checkbox is not selected.
  • Click on PDA and select I9505XXUBMEA_I9505OXXBMF1_I9505XXUBMEA_HOME.tar.md5 file.

– Optionally reset the Flash Counter:

The Flash Counter is something that Samsung put in to keep track of how many custom firmwares were flashed on your device. To reclaim the manufacturer warranty and to enable OTA updates again, do this:

  • Download Triangle Away from Google Play or from XDA web site (free download).
  • Run Triangle Away and grant SuperUser permission once asked.
  • Tap Continue to confirm your correct Galaxy S4 model number.
  • Verify your Flash Counter status. then select Reset flash counter.
  • Follow the on-screen instructions till your device reboots into Download mode.
  • Once you see Downloading… press the power button for 10 seconds until the screen turns off.
  • The device will automatically turn back into the Triangle Away reset flash counter mode.
  • Press the volume up key to reset counter and status.
  • After a few seconds it says Done!.  The Flash Counter is reset.
  • Press the volume up to reboot the device.

– Wipe data, cache and Dalvik cache. This will not wipe your external MicroSD card.

Using Stock Recovery:

  • Turn off your device.
  • Press and hold Volume up + Power + Home buttons simultaneously. After appearing Samsung logo release the buttons. To navigate through this menu, use the volume up/down buttons to scroll up and down and the power button to confirm selection.
  • Choose Wipe data/factory reset then select Yes — delete all user data.
  •  Return to the main and select reboot system now to reboot the device.

Using TWRP Recovery:

  • Turn off your device.
  • Press and hold Volume up + Power + Home buttons simultaneously. After appearing Samsung logo release the buttons.
  • Select Wipe then slide Swipe to factory Reset.
  • Go back to main menu.
  • Select Reboot then tap Download to reboot in Download mode (Skip next step).

– Set your device in Download mode:

  • Turn off your device.
  • Press and hold Volume Down + Power + Home buttons simultaneously. Release the buttons only when the Warning!! message appears.
  • Press Volume Up button to enter into Download mode.

– Connect your device to your PC. Odin should now recognize the device and the ID:COM field should turn yellow. This means that it has detected your device without a problem.

– Click Start. Wait a couple of minutes until the following conditions are met:

  • The device reboots (except entering PIN code for your SIM after reboot, avoid any other action).
  • The ID:COM box turns green and says PASS!.
  • The log box displays all threads completed.

Stock_ODIN_SGS4

– The flashing operation is complete. Unplug the USB cable.

Log

Below a copy of Odin’s log box content:

<OSM> Enter CS for MD5..
<OSM> Check MD5.. Do not unplug the cable..
<OSM> Please wait..
<OSM> I9505XXUBMEA_I9505OXXBMF1_I9505XXUBMEA_HOME.tar.md5 is valid.
<OSM> Checking MD5 finished Sucessfully..
<OSM> Leave CS..
<ID:0/004> Added!!
<ID:0/004> Odin v.3 engine (ID:4)..
<ID:0/004> File analysis..
<ID:0/004> SetupConnection..
<ID:0/004> Initialzation..
<ID:0/004> Get PIT for mapping..
<ID:0/004> Firmware update start..
<ID:0/004> boot.img
<ID:0/004> NAND Write Start!!
<ID:0/004> recovery.img
<ID:0/004> system.img.ext4
<ID:0/004> modem.bin
<ID:0/004> NON-HLOS.bin
<ID:0/004> cache.img.ext4
<ID:0/004> hidden.img.ext4
<ID:0/004> RQT_CLOSE !!
<ID:0/004> RES OK !!
<ID:0/004> Removed!!
<ID:0/004> Remain Port .... 0
<OSM> All threads completed. (succeed 1 / failed 0)

Install TWRP Recovery on Samsung Galaxy S4 I9505

The TeamWin Recovery Project (TWRP) is a graphical touch based custom recovery manager. It offers the same functionalities as the stock-Android recovery with a few addition features, such as the ability to make full system backups, as well as flash custom ROMs. Since a rooted device is not required, it can be installed in anyone with an unlocked bootloader.

This guide is intended only for the I9505 international version of the Galaxy S4. Do not try this on any other models of the Galaxy S4 or you will end up bricking your device. Use it at your own risk.

Prerequisites

– Make a backup of all your important data before following this guide.
– Ensure the battery of the phone is charged more than 80%.
– Download openrecovery-twrp-2.5.0.2-jfltexx.tar.
– Download Odin v3.07.
– Download Samsung Galaxy S4 USB drivers.
– Windows 7 x64.

Procedure

– Install the Samsung Galaxy S4 USB drivers.

Note that the Samsung Kies also installs the USB drivers. However, Kies is known to cause problems when Odin is attempting to communicate with your device, so ensure it is really closed (use Windows Task Manager to kill it and its related processes if you need to).

– Enable USB debugging mode on the device (Go to Settings -> More tab -> Developer options, then check box in front of USB debugging).

If Developer option is not shown by default then do:

  • Go to Settings, tap More tab then navigate to the bottom and select About.
  • Scroll down and tap Build number several times until you see a message that says Developer mode has been enabled.
  • Go back and you should see the Developer options menu appear under System manager.
  • Select Developer options then tap the check box in front of USB debugging.

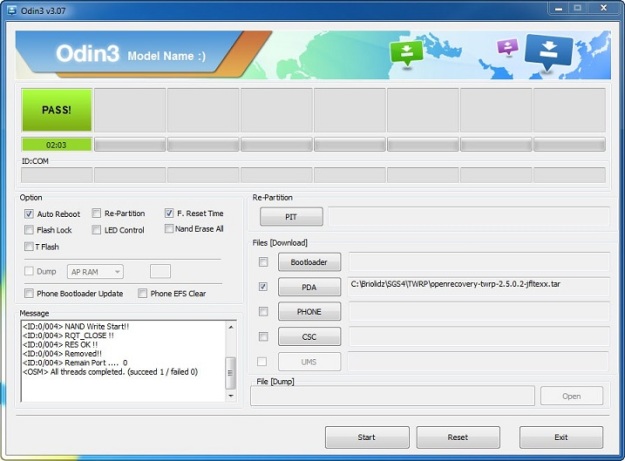
– Run Odin v3.07 as administrator.

  • Check Auto Reboot and F. Reset Time.
  • Make sure that the re-partition checkbox is not selected.
  • Click on PDA and select openrecovery-twrp-2.5.0.2-jfltexx.tar file.

– Set your device in Download mode:

  • Turn off your device.
  • Press and hold Volume Down + Power + Home buttons simultaneously. Release the buttons only when the Warning!! message appears.
  • Press Volume Up button to enter into Download mode.

– Connect your device to your PC. Odin should now recognize the device and the ID:COM field should turn yellow. This means that it has detected your device without a problem.

– Click Start. Wait a couple of minutes until the following conditions are met:

  • The device reboots (except entering PIN code for your SIM after reboot, avoid any other action).
  • The ID:COM box turns green and says PASS!.
  • The log box displays all threads completed.

TWRP_ODIN_SGS4

– The flashing operation is complete. Unplug the USB cable.

– To boot in the newly installed recovery, do:

  • Power off the device.
  • Press and hold Volume up + Power + Home buttons simultaneously. After appearing Samsung logo release the buttons.

Log

Below a copy of Odin’s log box content:

<ID:0/004> Added!!
<ID:0/004> Odin v.3 engine (ID:4)..
<ID:0/004> File analysis..
<ID:0/004> SetupConnection..
<ID:0/004> Initialzation..
<ID:0/004> Get PIT for mapping..
<ID:0/004> Firmware update start..
<ID:0/004> recovery.img
<ID:0/004> NAND Write Start!!
<ID:0/004> RQT_CLOSE !!
<ID:0/004> RES OK !!
<ID:0/004> Removed!!
<ID:0/004> Remain Port ....  0
<OSM> All threads completed. (succeed 1 / failed 0)

How to Root the Samsung Galaxy S4 I9505

Rooting is the process by which you attain full administrative control, also known as root access, within Android subsystem. Doing so, allows removing bloatwares (built-in applications that comes together with your device), altering or replacing system settings, running custom ROMS on your device …

This guide is intended only for the I9505 international version of the Galaxy S4 running 4.2.2 Jelly Bean firmware. Do not try this on any other models of the Galaxy S4 or you will end up bricking your device. Use it at your own risk.

Prerequisites

– Make a backup of all your important data before following this guide.
– Ensure the battery of the phone is charged more than 80%.
– Download CF-Auto-Root-jflte-jfltexx-gti9505.zip.
– Download Samsung Galaxy S4 USB drivers.
– Windows 7 x64.

Procedure

– Install the Samsung Galaxy S4 USB drivers.

Note that the Samsung Kies also installs the USB drivers. However, Kies is known to cause problems when Odin is attempting to communicate with your device, so ensure it is really closed (use Windows Task Manager to kill it and its related processes if you need to).

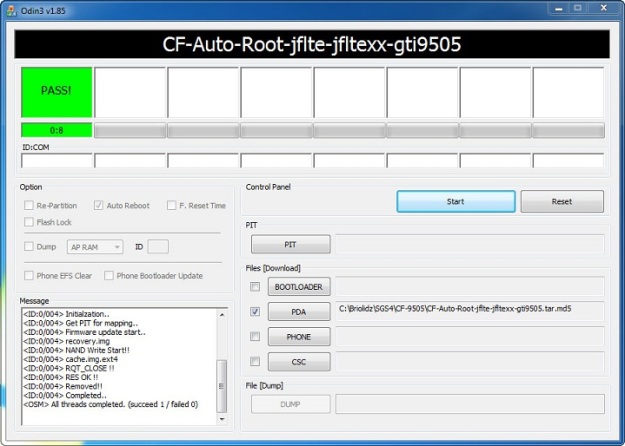
– Unzip CF-Auto-Root-jflte-jfltexx-gti9505.zip to a folder of your choice. From the extracted folder, run Odin3-v1.85.exe as administrator.

– Click on the PDA button in Odin then browse and select CF-Auto-Root-jflte-jfltexx-gti9505.tar.md5 file.

– Enable USB debugging mode on the device (Go to Settings -> More tab -> Developer options, then check box in front of USB debugging).

If Developer option is not shown by default then do:

  • Go to Settings, tap More tab then navigate to the bottom and select About.
  • Scroll down and tap Build number several times until you see a message that says Developer mode has been enabled.
  • Go back and you should see the Developer options menu appear under System manager.
  • Select Developer options then tap the check box in front of USB debugging.

– Set your device in Download mode:

  • Turn off your device.
  • Press and hold Volume Down + Power + Home buttons simultaneously. Release the buttons only when the Warning!! message appears.
  • Press Volume Up button to enter into Download mode.

– Connect your device to your PC. Odin should now recognize the device and the ID:COM field should turn yellow. This means that it has detected your device without a problem.

Verify that only Auto Reboot is checked under the Option section.

– Click Start. Wait a couple of minutes until the following conditions are met:

  • The device reboots (except entering PIN code for your SIM after reboot, avoid any other action).
  • The ID:COM box turns green and says PASS!.
  • The log box displays all threads completed.

Root_ODIN_SGS4

– The flashing operation is complete. Unplug the USB cable.

– You can confirm whether your phone has been rooted by looking for SuperSU application on the application drawer.

Log

Below a copy of Odin’s log box content:

<ID:0/004> Added!!
 Enter CS for MD5..
 Check MD5.. Do not unplug the cable..
 Please wait..
 CF-Auto-Root-jflte-jfltexx-gti9505.tar.md5 is valid.
 Checking MD5 finished Sucessfully..
 Leave CS..
<ID:0/004> Odin v.3 engine (ID:4)..
<ID:0/004> File analysis..
<ID:0/004> SetupConnection..
<ID:0/004> Initialzation..
<ID:0/004> Get PIT for mapping..
<ID:0/004> Firmware update start..
<ID:0/004> recovery.img
<ID:0/004> NAND Write Start!!
<ID:0/004> cache.img.ext4
<ID:0/004> RQT_CLOSE !!
<ID:0/004> RES OK !!
<ID:0/004> Removed!!
<ID:0/004> Completed..
 All threads completed. (succeed 1 / failed 0)