Category Archives: Open source

Samsung Galaxy S4 I9505: Pre-Rooted KNOX-Free TouchWiz ROM

This guide is intended for people looking for a KNOX-free TouchWiz experience using the Echoe SLIM custom ROM. This ROM brings several features such as:

  • Custom Kernel (fast and battery friendly).
  • No KNOX bootloader.
  • Pre-Rooted, zipaligned and deodexed.
  • Debloated (small storage size and reduced memory usage).
  • Lots of tweaks …

The TWRP custom recovery will be used to flash the ROM zip file on your device. This guide is tested with Echoe SLIM v9. Feel free to upgrade to the latest version.

Do not try this on any other models of the Galaxy S4 or you will end up bricking your device. Use it at your own risk.

Prerequisites

– Make a backup of all your important data before following this guide. All data on your device will be deleted and your custom recovery will be overwritten.
– Ensure the battery of the phone is charged more than 80%.
– Download Echoe SLIM v9 (Based on Samsung 4.3 I9505XXUEMK8 firmware).
– Download I9505_XXUEMK8_MODEM.rar.
– Download openrecovery-twrp-2.6.3.1-jfltexx.tar.
– Download Odin v3.09.
– Download Samsung Galaxy S4 USB drivers.
– Windows 7 x64.

If you already installed KNOX bootloader (found in Samsung 4.3 stock firmware and higher) then you should know that the latter verifies signatures of loaded kernels and recoveries. As a result, no custom ones can be installed without voiding the KNOX warranty. Actually, there is no known way to reset this warranty flag. Do not continue if you want to keep your warranty with your KNOX enabled firmware/bootloader.

Flashing the Echoe custom ROM does not modify your already installed bootloader and modem making this ROM of big interest.

Preliminary Setup

– Install the Samsung Galaxy S4 USB drivers.

Note that the Samsung Kies also installs the USB drivers. However, Kies is known to cause problems when Odin is attempting to communicate with your device, so ensure it is really closed (use Windows Task Manager to kill it and its related processes if you need to).

– Enable USB debugging mode on the device (Go to Settings -> More tab -> Developer options, then check box in front of USB debugging).

If Developer option is not shown by default then do:

  • Go to Settings, tap More tab then navigate to the bottom and select About.
  • Scroll down and tap Build number several times until you see a message that says Developer mode has been enabled.
  • Go back and you should see the Developer options menu appear under System manager.
  • Select Developer options then tap the check box in front of USB debugging.

Install TWRP recovery

– Download openrecovery-twrp-2.6.3.1-jfltexx.tar.

– Follow my previous article called Install TWRP Recovery on Samsung Galaxy S4 I9505 to install this custom recovery.

I recommend using Odin v3.09. The UI changes compared to previous versions are as follows:

  • The new field AutoStart is by default set to ““.
  • The Bootloader, PDA, and PHONE buttons are renamed to BL, AP, and CP.

Flash the Echoe ROM

– Download Echoe SLIM v9 custom ROM as a zip file.

– Connect your device to your PC with the Samsung USB Cable.

– Copy the downloaded ROM zip file to your external SD card root folder (IMPORTANT).

– Turn off your device and disconnect from the USB cable.

– Boot into TWRP Recovery Mode. Press and hold Volume up + Power + Home buttons simultaneously. After appearing Samsung logo release the buttons.

Wipe standard partitions (highly recommended before installing any custom ROM):

  • Once in TWRP recovery, choose Wipe then tap Advanced Wipe.
  • Check Dalvick cache, system, Data, Internal Storage and cache.
  • Slide Swipe to wipe.

– Return to main menu then choose Install.

– Select the ROM zip file from external card root folder. Uncheck zip file signature verification then slide Swipe to confirm flash. The installation procedure starts now.

– Return to main menu, choose Reboot then select System. You device will take several minutes to boot the first time.

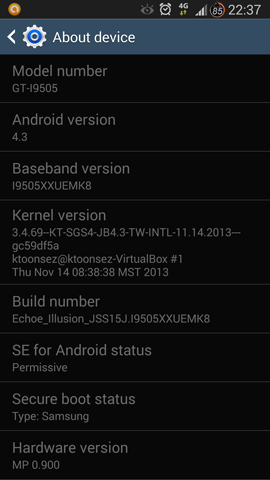
– Open Settings, select More tab then choose About phone to verify that you successfully installed the Echoe custom ROM (see screenshot of the final result at the end of this guide).

Wi-Fi always on

If the Wi-Fi turns off automatically when you put the device to sleep, then you can tweak the settings to keep it awake always:

  • Tap Settings from the home screen.
  • Open Connections tab then select Wi-Fi .
  • From the menu button select Advanced.
  • Set Keep Wi-Fi on during sleep to Always.

Flash the modem

If your modem is working fine you don’t need to flash it. The modem doesn’t have to match the firmware base. Flashing the modem is highly recommended in the following situations:

  • No mobile data traffic after screen off.
  • Jump from an older Android version.

Below the procedure to install the XXUEMK8 modem that matches the Samsung 4.3 I9505XXUEMK8 firmware (You can use the same procedure to install another modem).

– Download I9505_XXUEMK8_MODEM.rar. Use your favorite tool to extract the I9505_XXUEMK8_MODEM.tar file (I recommend 7-zip).

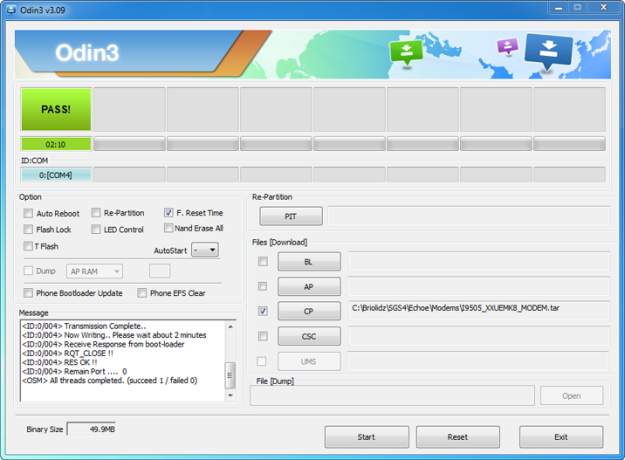
– Run Odin v3.09 as administrator.

  • UnCheck Auto Reboot.
  • Check F. Reset Time.
  • Make sure that the re-partition checkbox is not selected.
  • Click CP then load I9505_XXUEMK8_MODEM.tar.

– Power off the device (IMPORTANT).

– Set your device in Download mode:

  • Press and hold Volume Down + Power + Home buttons simultaneously. Release the buttons only when the Warning!! message appears.
  • Press Volume Up button to enter into Download mode.

– Connect your device to your PC with the Samsung USB Cable. Odin should now recognize the device and the ID:COM field should turn yellow. This means that it has detected your device without a problem.

– Click Start. Wait a couple of minutes until the following conditions are met:

  • The ID:COM box turns green and says PASS!.
  • The log box displays all threads completed.

– The flashing operation is complete. Exit Odin and unplug the USB cable.

– Hold Power button for 10 seconds till phone resets (you feel the vibration).

ModemMK8

Below a copy of Odin’s log box content:

<ID:0/004> Added!!
<ID:0/004> Odin v.3 engine (ID:4)..
<ID:0/004> File analysis..
<ID:0/004> SetupConnection..
<ID:0/004> Initialzation..
<ID:0/004> Get PIT for mapping..
<ID:0/004> Firmware update start..
<ID:0/004> SingleDownload.
<ID:0/004> modem.bin
<ID:0/004> NAND Write Start!!
<ID:0/004> Transmission Complete..
<ID:0/004> Now Writing.. Please wait about 2 minutes
<ID:0/004> Receive Response from boot-loader
<ID:0/004> RQT_CLOSE !!
<ID:0/004> RES OK !!
<ID:0/004> Remain Port ....  0
<OSM> All threads completed. (succeed 1 / failed 0)

Final result

Below a screenshot of my device About device main content:
AboutDevice-EchoeSLIMv9

Samsung Galaxy S4 I9505: Unroot and restore to stock ROM

There are several reasons to restore a Samsung Galaxy S4 back to official stock firmware. The main reasons are:

  • Unroot and receive OTA updates again.
  • Resurrect/unbrick the device.
  • Reclaim the manufacturer warranty.

This guide is intended only for the I9505 international version of the Galaxy S4 to flash I9505XXUBMEA – XEF 4.2.2 Jelly Bean stock Samsung firmware. Do not try this on any other models of the Galaxy S4 or you will end up bricking your device. Use it at your own risk.

Prerequisites

– Make a backup of all your important data before following this guide. All data on your device will be deleted and your custom recovery will be overwritten.
– Ensure the battery of the phone is charged more than 80%.
– Download I9505XXUBMEA_I9505OXXBMF1_XEF.zip stock Samsung 4.2.2 Jelly Bean firmware.
– Download Odin v3.07.
– Download Samsung Galaxy S4 USB drivers.
– Windows 7 x64.

Procedure

– Install the Samsung Galaxy S4 USB drivers.

Note that the Samsung Kies also installs the USB drivers. However, Kies is known to cause problems when Odin is attempting to communicate with your device, so ensure it is really closed (use Windows Task Manager to kill it and its related processes if you need to).

– Unzip I9505XXUBMEA_I9505OXXBMF1_XEF.zip to a folder of your choice. The file I9505XXUBMEA_I9505OXXBMF1_I9505XXUBMEA_HOME.tar.md5 is a stock Samsung firmware and has the following settings:

Model: GT-I9505
Country: France
Version: Android 4.2.2
Changelist: 768421
Build date: Wed, 29 May 2013 16:05:23 +0000
Product Code: XEF
PDA: I9505XXUBMEA
CSC: I9505OXXBMF1
MODEM: I9505XXUBMEA

– Run Odin v3.07 as administrator:

  • Check Auto Reboot and F. Reset Time.
  • Make sure that the re-partition checkbox is not selected.
  • Click on PDA and select I9505XXUBMEA_I9505OXXBMF1_I9505XXUBMEA_HOME.tar.md5 file.

– Optionally reset the Flash Counter:

The Flash Counter is something that Samsung put in to keep track of how many custom firmwares were flashed on your device. To reclaim the manufacturer warranty and to enable OTA updates again, do this:

  • Download Triangle Away from Google Play or from XDA web site (free download).
  • Run Triangle Away and grant SuperUser permission once asked.
  • Tap Continue to confirm your correct Galaxy S4 model number.
  • Verify your Flash Counter status. then select Reset flash counter.
  • Follow the on-screen instructions till your device reboots into Download mode.
  • Once you see Downloading… press the power button for 10 seconds until the screen turns off.
  • The device will automatically turn back into the Triangle Away reset flash counter mode.
  • Press the volume up key to reset counter and status.
  • After a few seconds it says Done!.  The Flash Counter is reset.
  • Press the volume up to reboot the device.

– Wipe data, cache and Dalvik cache. This will not wipe your external MicroSD card.

Using Stock Recovery:

  • Turn off your device.
  • Press and hold Volume up + Power + Home buttons simultaneously. After appearing Samsung logo release the buttons. To navigate through this menu, use the volume up/down buttons to scroll up and down and the power button to confirm selection.
  • Choose Wipe data/factory reset then select Yes — delete all user data.
  •  Return to the main and select reboot system now to reboot the device.

Using TWRP Recovery:

  • Turn off your device.
  • Press and hold Volume up + Power + Home buttons simultaneously. After appearing Samsung logo release the buttons.
  • Select Wipe then slide Swipe to factory Reset.
  • Go back to main menu.
  • Select Reboot then tap Download to reboot in Download mode (Skip next step).

– Set your device in Download mode:

  • Turn off your device.
  • Press and hold Volume Down + Power + Home buttons simultaneously. Release the buttons only when the Warning!! message appears.
  • Press Volume Up button to enter into Download mode.

– Connect your device to your PC. Odin should now recognize the device and the ID:COM field should turn yellow. This means that it has detected your device without a problem.

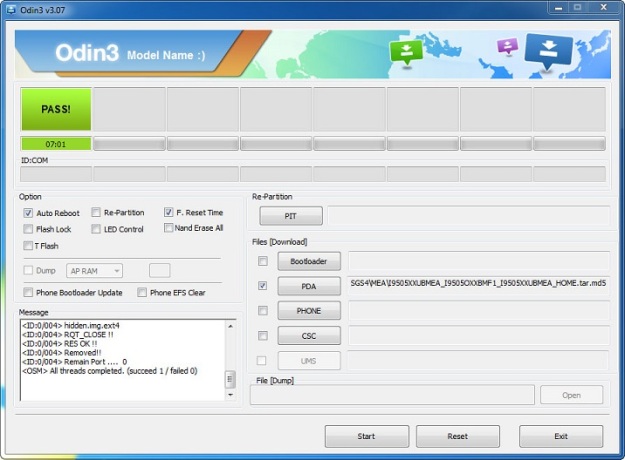
– Click Start. Wait a couple of minutes until the following conditions are met:

  • The device reboots (except entering PIN code for your SIM after reboot, avoid any other action).
  • The ID:COM box turns green and says PASS!.
  • The log box displays all threads completed.

Stock_ODIN_SGS4

– The flashing operation is complete. Unplug the USB cable.

Log

Below a copy of Odin’s log box content:

<OSM> Enter CS for MD5..
<OSM> Check MD5.. Do not unplug the cable..
<OSM> Please wait..
<OSM> I9505XXUBMEA_I9505OXXBMF1_I9505XXUBMEA_HOME.tar.md5 is valid.
<OSM> Checking MD5 finished Sucessfully..
<OSM> Leave CS..
<ID:0/004> Added!!
<ID:0/004> Odin v.3 engine (ID:4)..
<ID:0/004> File analysis..
<ID:0/004> SetupConnection..
<ID:0/004> Initialzation..
<ID:0/004> Get PIT for mapping..
<ID:0/004> Firmware update start..
<ID:0/004> boot.img
<ID:0/004> NAND Write Start!!
<ID:0/004> recovery.img
<ID:0/004> system.img.ext4
<ID:0/004> modem.bin
<ID:0/004> NON-HLOS.bin
<ID:0/004> cache.img.ext4
<ID:0/004> hidden.img.ext4
<ID:0/004> RQT_CLOSE !!
<ID:0/004> RES OK !!
<ID:0/004> Removed!!
<ID:0/004> Remain Port .... 0
<OSM> All threads completed. (succeed 1 / failed 0)

Install TWRP Recovery on Samsung Galaxy S4 I9505

The TeamWin Recovery Project (TWRP) is a graphical touch based custom recovery manager. It offers the same functionalities as the stock-Android recovery with a few addition features, such as the ability to make full system backups, as well as flash custom ROMs. Since a rooted device is not required, it can be installed in anyone with an unlocked bootloader.

This guide is intended only for the I9505 international version of the Galaxy S4. Do not try this on any other models of the Galaxy S4 or you will end up bricking your device. Use it at your own risk.

Prerequisites

– Make a backup of all your important data before following this guide.
– Ensure the battery of the phone is charged more than 80%.
– Download openrecovery-twrp-2.5.0.2-jfltexx.tar.
– Download Odin v3.07.
– Download Samsung Galaxy S4 USB drivers.
– Windows 7 x64.

Procedure

– Install the Samsung Galaxy S4 USB drivers.

Note that the Samsung Kies also installs the USB drivers. However, Kies is known to cause problems when Odin is attempting to communicate with your device, so ensure it is really closed (use Windows Task Manager to kill it and its related processes if you need to).

– Enable USB debugging mode on the device (Go to Settings -> More tab -> Developer options, then check box in front of USB debugging).

If Developer option is not shown by default then do:

  • Go to Settings, tap More tab then navigate to the bottom and select About.
  • Scroll down and tap Build number several times until you see a message that says Developer mode has been enabled.
  • Go back and you should see the Developer options menu appear under System manager.
  • Select Developer options then tap the check box in front of USB debugging.

– Run Odin v3.07 as administrator.

  • Check Auto Reboot and F. Reset Time.
  • Make sure that the re-partition checkbox is not selected.
  • Click on PDA and select openrecovery-twrp-2.5.0.2-jfltexx.tar file.

– Set your device in Download mode:

  • Turn off your device.
  • Press and hold Volume Down + Power + Home buttons simultaneously. Release the buttons only when the Warning!! message appears.
  • Press Volume Up button to enter into Download mode.

– Connect your device to your PC. Odin should now recognize the device and the ID:COM field should turn yellow. This means that it has detected your device without a problem.

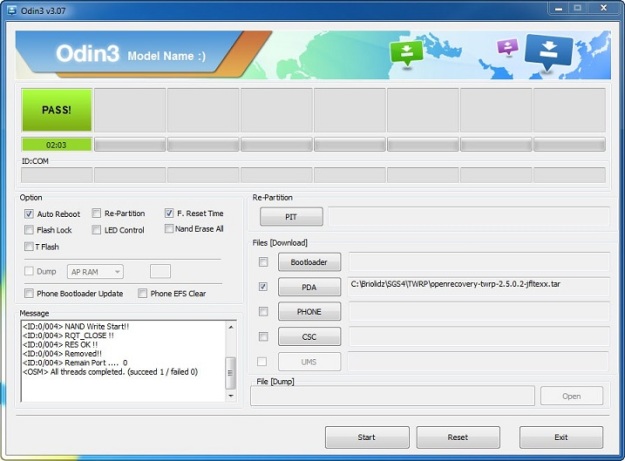
– Click Start. Wait a couple of minutes until the following conditions are met:

  • The device reboots (except entering PIN code for your SIM after reboot, avoid any other action).
  • The ID:COM box turns green and says PASS!.
  • The log box displays all threads completed.

TWRP_ODIN_SGS4

– The flashing operation is complete. Unplug the USB cable.

– To boot in the newly installed recovery, do:

  • Power off the device.
  • Press and hold Volume up + Power + Home buttons simultaneously. After appearing Samsung logo release the buttons.

Log

Below a copy of Odin’s log box content:

<ID:0/004> Added!!
<ID:0/004> Odin v.3 engine (ID:4)..
<ID:0/004> File analysis..
<ID:0/004> SetupConnection..
<ID:0/004> Initialzation..
<ID:0/004> Get PIT for mapping..
<ID:0/004> Firmware update start..
<ID:0/004> recovery.img
<ID:0/004> NAND Write Start!!
<ID:0/004> RQT_CLOSE !!
<ID:0/004> RES OK !!
<ID:0/004> Removed!!
<ID:0/004> Remain Port ....  0
<OSM> All threads completed. (succeed 1 / failed 0)

How to Root the Samsung Galaxy S4 I9505

Rooting is the process by which you attain full administrative control, also known as root access, within Android subsystem. Doing so, allows removing bloatwares (built-in applications that comes together with your device), altering or replacing system settings, running custom ROMS on your device …

This guide is intended only for the I9505 international version of the Galaxy S4 running 4.2.2 Jelly Bean firmware. Do not try this on any other models of the Galaxy S4 or you will end up bricking your device. Use it at your own risk.

Prerequisites

– Make a backup of all your important data before following this guide.
– Ensure the battery of the phone is charged more than 80%.
– Download CF-Auto-Root-jflte-jfltexx-gti9505.zip.
– Download Samsung Galaxy S4 USB drivers.
– Windows 7 x64.

Procedure

– Install the Samsung Galaxy S4 USB drivers.

Note that the Samsung Kies also installs the USB drivers. However, Kies is known to cause problems when Odin is attempting to communicate with your device, so ensure it is really closed (use Windows Task Manager to kill it and its related processes if you need to).

– Unzip CF-Auto-Root-jflte-jfltexx-gti9505.zip to a folder of your choice. From the extracted folder, run Odin3-v1.85.exe as administrator.

– Click on the PDA button in Odin then browse and select CF-Auto-Root-jflte-jfltexx-gti9505.tar.md5 file.

– Enable USB debugging mode on the device (Go to Settings -> More tab -> Developer options, then check box in front of USB debugging).

If Developer option is not shown by default then do:

  • Go to Settings, tap More tab then navigate to the bottom and select About.
  • Scroll down and tap Build number several times until you see a message that says Developer mode has been enabled.
  • Go back and you should see the Developer options menu appear under System manager.
  • Select Developer options then tap the check box in front of USB debugging.

– Set your device in Download mode:

  • Turn off your device.
  • Press and hold Volume Down + Power + Home buttons simultaneously. Release the buttons only when the Warning!! message appears.
  • Press Volume Up button to enter into Download mode.

– Connect your device to your PC. Odin should now recognize the device and the ID:COM field should turn yellow. This means that it has detected your device without a problem.

Verify that only Auto Reboot is checked under the Option section.

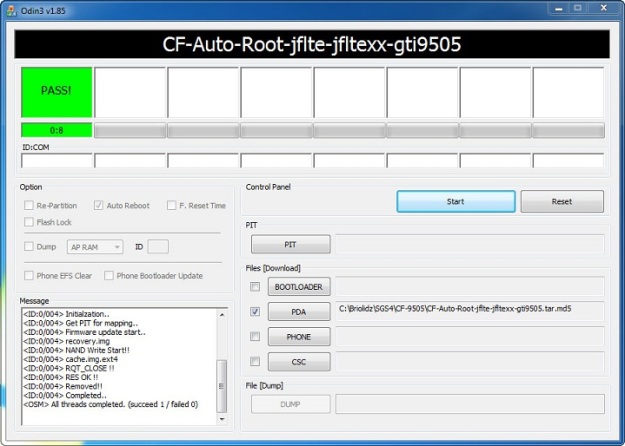
– Click Start. Wait a couple of minutes until the following conditions are met:

  • The device reboots (except entering PIN code for your SIM after reboot, avoid any other action).
  • The ID:COM box turns green and says PASS!.
  • The log box displays all threads completed.

Root_ODIN_SGS4

– The flashing operation is complete. Unplug the USB cable.

– You can confirm whether your phone has been rooted by looking for SuperSU application on the application drawer.

Log

Below a copy of Odin’s log box content:

<ID:0/004> Added!!
 Enter CS for MD5..
 Check MD5.. Do not unplug the cable..
 Please wait..
 CF-Auto-Root-jflte-jfltexx-gti9505.tar.md5 is valid.
 Checking MD5 finished Sucessfully..
 Leave CS..
<ID:0/004> Odin v.3 engine (ID:4)..
<ID:0/004> File analysis..
<ID:0/004> SetupConnection..
<ID:0/004> Initialzation..
<ID:0/004> Get PIT for mapping..
<ID:0/004> Firmware update start..
<ID:0/004> recovery.img
<ID:0/004> NAND Write Start!!
<ID:0/004> cache.img.ext4
<ID:0/004> RQT_CLOSE !!
<ID:0/004> RES OK !!
<ID:0/004> Removed!!
<ID:0/004> Completed..
 All threads completed. (succeed 1 / failed 0)

Compiling Qt with Visual Studio 2010

Qt is an object oriented C++ cross-platform GUI toolkit which can be used to build applications that run natively on several platforms including Windows, Linux, Mac OS, and embedded Linux without source code changes. Qt is available under GPL v3, LGPL v2 and a commercial license.

This tutorial is intended for Windows users preferring to stick to Visual Studio 2010 as a primary development environment instead of Qt Creator. It provides step-by-step instructions for compiling Qt from source using the open-source distribution.

Prerequisites

    • Visual Studio 2010 Professional with SP1.
    • Windows 7 Professional.
    • Qt 4.8.0 open-source distribution (or a recent Qt 4.7.x version).
    • Qt Visual Studio Add-in.
    • ActivePerl.

Setup Visual Studio 2010

1. Download and install Microsoft Visual Studio 2010 Service Pack 1.

2. For x64 users, it is recommended to download and install this patch for Visual Studio 2010, if it is not already up-to-date.

3. Download and install the Qt Visual Studio Add-In. After installation, a new menu called Qt is added to Visual Studio 2010.

Download and install ActivePerl

ActiveState provides a Perl distribution for Windows platforms. Download and install the latest x86 version from here. Stick to x86 unless you have any special reason for using 64-bit applications.

During installation, make sure that Add Perl to the PATH environment variable and Create Perl file extension association checkboxes are selected.

Download and compile Qt

1. Download the Qt source code as a .zip file. The Qt-everywhere package version 4.8.0 is located here.

2. Unzip the previous file into a location without spaces and special characters. I will use C:\Qt\4.8.0.

3. Open a Visual Studio Command Prompt: All programs -> Microsoft Visual Studio 2010 -> Visual Studio Tools -> Visual Studio Command Prompt (2010). Stick to x86 unless you have any special reason for using 64-bit applications.

4. Get Qt configured:

C:\Program Files (x86)\Microsoft Visual Studio 10.0\VC> cd C:\Qt\4.8.0
C:\Qt\4.8.0> configure -debug-and-release -opensource -shared -platform win32-msvc2010

Type y and press Enter to accept the terms of the license agreement.

You can of course specify additional options to add or remove some features depending upon your requirements. Type configure -help to get more details.

5. Compile Qt:

C:\Qt\4.8.0> nmake

The compilation takes a long time. Be patient.

Create a new Qt project

1. Open Visual Studio 2010. Go to Qt –> Qt Options and add the folder C:\Qt\4.8.0.


2. Create a new Qt project (File -> New -> Project… then select Qt4 Projects) or open an existing .pro file.

Debug and Release versions of the Qt shared libraries (QtCore4.dll, QtGui4.dll, QtCore4d.dll, QtGui4d.dll …) are located in C:\Qt\4.8.0\bin folder.  You will need to distribute the relevant ones used by the application when deploying on other systems.

Improving Debian 6 (Squeeze) fonts rendering

The default Terminal and desktop fonts rendering of Debian Squeeze are nice but when it comes to intensive web browsing, particularly in high resolution, Debian is not as much comfortable as other operating systems such as Mac OS, Ubuntu and Windows.

The following instructions and commands provide an easy way to improve the overall display rendering with minimal changes to enable bold effects in GNOME sessions for a pleasant Web browsing experience with Google Chrome.

1. Update fonts configuration files.

Switch to root user.

$ su -
Password:

Download the new fontconfig XML files.

# wget http://www.osresources.com/files/centos-windows-fonts/fontconfig.tbz

Backup old configuration files then extract new ones into /etc/fonts.

# for i in `ls /etc/fonts/*.conf`; do cp $i $i.bak; done
# tar xvjpf fontconfig.tbz -C /etc/fonts/

Clean up.

# rm fontconfig.tbz

Exit root session.

# exit

Restart your GNOME session.

$ gnome-session-save --logout

2. Download, install and configure Google Chrome.

Switch to root user.

$ su -
Password:

Debian Squeeze comes with Chromium Web Browser version 6.x. Download and install the latest version of Google Chrome. Replace i386 by amd64 if your operation system is 64 bits.

# wget https://dl.google.com/linux/direct/google-chrome-stable_current_i386.deb
# dpkg -i google-chrome-stable_current_i386.deb

If you get the following message:

Errors were encountered while processing:
  google-chrome-stable

Then install missing dependencies as follows:

# apt-get -f install

Clean up and exit root session.

# rm google-chrome-stable_current_i386.deb
# exit

Run Google Chrome by opening Applications > Internet > Google Chrome or by issuing the following command:

$ google-chrome &

Click on the wrench icon in top right corner and select Preferences. In the Under the Hood tab, set Page zoom to 125%.

Installing VMware Tools on Debian 6 (Squeeze)

VMware Tools are an optional set of drivers and utilities that can greatly improve the speed, efficiency and manageability of the virtual machine’s guest operating system. These tools allow cut and paste, mouse and clock synchronization, folder sharing across environments and several other key benefits.

This tutorial has been tested on Debian Squeeze running on VMware Workstation 8. The following steps should work on all the latest versions of Debian and VMware Workstation/Player.

1. In an X session, launch a Terminal and switch to root user.

$ su -
Password:

2. Update your system.

# apt-get update

3. Install kernel headers and tools required to compile and install VMware Tools.

# apt-get install make gcc linux-headers-$(uname -r)

4. Mount the VMware Tools virtual CD.

In VMware Workstation menu, click VM then select Install VMware Tools… menu item. This will put a VMware Tools CD icon on the desktop and a File Browser window should be opened immediately.

If the file browser doesn’t open or it is empty, then in the VMware Workstation menu, click VM, choose Cancel VMware Tools Installation, accept if asked to disconnect the CD-ROM and try again this step.

5. Extract VMware Tools to the tmp directory.

# cd /media/cdrom
# tar -C /tmp -zxvf VMwareTools-*.tar.gz

6. Start the installation.

# cd /tmp/vmware-tools-distrib
# ./vmware-install.pl

Accept the defaults for every question.

7. Clean up.

# cd /tmp
# rm -rf vmware-tools.distrib

8. VMware Tools is now installed and configured. Restart the machine to get all features working.

# reboot

Building embedded ARM systems with Crosstool-NG

This tutorial deals with creating a minimal embedded ARM system from scratch. The approach taken here requires no additional hardware beyond the development host and the source code of the required softwares. QEMU is used to run and debug the ARM system.

This tutorial details the following topics:

    • Building a toolchain for ARM using Crosstool-NG.
    • Building QEMU with ARM system emulation support.
    • Building an ARM Linux kernel.
    • Building and extending a tiny filesystem from scratch, based on BusyBox.
    • Debugging ARM applications inside QEMU.

I intentionally kept the default settings when applicable for simplicity and clarity reasons. Many things can be tweaked; you are encouraged to try alternate ways to become familiar with embedded systems.

Prerequisites

When writing this tutorial, I used the following environment:

Created a working folder:

$ mkdir -p ~/dev-embedded/ctool-ng

Building Crosstool-NG

Crosstool-NG allows building cross-compiling toolchains for multiple target architectures. This versatile tool provides a menuconfig configuration interface, which makes it quite easy to use. Crosstool-NG comes with a set of ready-made configuration files for various typical setups and supports glibc, uclibc and eglibc.

Install needed packages:

$ sudo apt-get install build-essential libncurses5-dev
$ sudo apt-get install automake libtool bison flex texinfo
$ sudo apt-get install gawk curl cvs subversion gcj-jdk
$ sudo apt-get install libexpat1-dev python-dev

Download, configure and install Crosstool-NG locally using —local option (Note that is possible to install it globally):

$ cd ~/dev-embedded/ctool-ng
$ wget http://crosstool-ng.org/download/crosstool-ng/crosstool-ng-1.13.2.tar.bz2
$ tar xjf crosstool-ng-1.13.2.tar.bz2
$ cd crosstool-ng-1.13.2
$ ./configure --local
$ make
$ make install

Crosstool-NG comes with a set of ready-made configuration files for various typical setups called samples. They can be listed by running:

$ ./ct-ng list-samples

Use the ARM EABI cross compiler for use on linux. Configure and produce this toolchain by issuing:

$ ./ct-ng arm-unknown-linux-gnueabi

Refine your configuration by running the menuconfig interface:

$ ./ct-ng menuconfig

At this point it is up to you to select what options you want. You can explore the available options by traveling through the menus and looking at the help for some of the options.

I recommend the following minimal change:

In Path and misc options, set Number of parallel jobs to 2 times the number of CPU cores in your workstation. This causes a faster building of your toolchain.

Disable Fortran and Java programming languages, if you are not going to use them:
In C compiler options, uncheck Fortran and Java.

Build Crosstool-NG:

$ ./ct-ng build

The operation Retrieving needed toolchain components’ tarballs starts. The ./build.log file is useful to track issues. If you get a problem related to fetching a tarball then try downloading the same version from another location or mirror into ./.build/tarballs folder and rerun the ./ct-ng build command.

Compilation takes a long time, be patient.

For the subsequent steps in this tutorial, you need to add path of executables you just installed to your PATH environment variable by issuing the following command:

$ export PATH=$PATH:$HOME/x-tools/arm-unknown-linux-gnueabi/bin

If you want to make it session wide then add the previous command to ~/.bashrc or ~/.pam_environment.

Now, you can verify that your ARM toolchain works by typing:

$ arm-unknown-linux-gnueabi-gcc -v

Building an ARM Linux kernel

This ARM kernel, built with a predefined configuration for the versatile platform board, will be used in the QEMU virtual machine.

Download and configure the kernel:

$ cd ~/dev-embedded/ctool-ng
$ wget http://www.kernel.org/pub/linux/kernel/v3.0/linux-3.2.tar.bz2
$ tar xjf linux-3.2.tar.bz2
$ cd linux-3.2
$ make ARCH=arm versatile_defconfig
$ make ARCH=arm menuconfig

The last command brings up the kernel configuration menu, go to the Kernel Features section, check Use the ARM EABI to compile the kernel then exit (Make sure to save your changes).

Compile the kernel:

$ make ARCH=arm CROSS_COMPILE=arm-unknown-linux-gnueabi- all

Once it’s done building, the compressed kernel image is located at ./arch/arm/boot/zImage.

Building QEMU

QEMU is a high performance full system simulator supporting both emulation and virtualization. QEMU supports emulating several CPU architectures that are different from the host running the simulation. QEMU is used as the core device model by both Xen and KVM.

Install needed packages:

$ sudo apt-get install zlib1g-dev libsdl-dev

Download, configure and build QEMU from source:

$ cd ~/dev-embedded/ctool-ng
$ wget http://download.savannah.gnu.org/releases/qemu/qemu-0.14.1.tar.gz
$ tar xzf qemu-0.14.1.tar.gz
$ cd qemu-0.14.1
$ ./configure --enable-sdl --disable-kvm --enable-debug --target-list=arm-softmmu
$ make

The executable located at ./qemu-0.14.1/arm-softmmu/qemu-system-arm is the full system emulator for the ARM architecture.

Building GNU Hello

The very simple GNU Hello program, a minimal example of a GNU package that prints Hello, world‘ when you run it, will be debugged in the QEMU virtual machine.

Download, configure and build GNU Hello:

$ cd ~/dev-embedded/ctool-ng
$ wget http://ftp.gnu.org/gnu/hello/hello-2.7.tar.gz
$ tar xzf hello-2.7.tar.gz
$ cd hello-2.7
$ CC=arm-unknown-linux-gnueabi-gcc ./configure --host=arm-unknown-linux-gnueabi
$ make

The ARM-executable is located at ./hello-2.7/src/hello.

Building BusyBox

BusyBox combines tiny versions of many common UNIX utilities into a single small executable, including a shell and an init process. BusyBox is used extensively to build embedded systems of many types and is customizable so that only the needed utilities are built.

Download, configure and build BusyBox from source:

$ cd ~/dev-embedded/ctool-ng
$ wget http://busybox.net/downloads/busybox-1.19.3.tar.bz2
$ tar xjf busybox-1.19.3.tar.bz2
$ cd busybox-1.19.3
$ make ARCH=arm CROSS_COMPILE=arm-unknown-linux-gnueabi- defconfig
$ make ARCH=arm CROSS_COMPILE=arm-unknown-linux-gnueabi- install

A folder, containing a minimal root filesystem, called _install is created.

Customizing the filesystem

In order to debug the GNU Hello program, a customization of our minimal filesystem created in the previous section is required. First, copy the following:

  • gdbserver built with arm-unknown-linux-gnueabi.
  • GNU hello executable compiled previously.

Copy required executables:

$ cd ~/dev-embedded/ctool-ng
$ cd busybox-1.19.3/_install
$ CROSSTOOLNG_DIR=$HOME/x-tools/arm-unknown-linux-gnueabi/arm-unknown-linux-gnueabi/
$ cp $CROSSTOOLNG_DIR/debug-root/usr/bin/gdbserver usr/bin/
$ cp ../../hello-2.7/src/hello usr/bin/

The minimal filesystem still lacks some shared libraries to run busybox, gdbserver and hello programs. These missing libraries can be enumerated using arm-unknown-linux-gnueabi-readelf (created when building the ARM toolchain) as following:

$ arm-unknown-linux-gnueabi-readelf ./usr/bin/hello -a |grep lib
$ arm-unknown-linux-gnueabi-readelf ./usr/bin/gdbserver -a |grep lib
$ arm-unknown-linux-gnueabi-readelf ../busybox -a |grep lib

After analyzing these commands output, you likely just needed to add the following libraries:

$ mkdir -p lib
$ cp $CROSSTOOLNG_DIR/sysroot/lib/ld-linux.so.3 lib/
$ cp $CROSSTOOLNG_DIR/sysroot/lib/libgcc_s.so.1 lib/
$ cp $CROSSTOOLNG_DIR/sysroot/lib/libm.so.6 lib/
$ cp $CROSSTOOLNG_DIR/sysroot/lib/libc.so.6 lib/
$ cp $CROSSTOOLNG_DIR/sysroot/lib/libdl.so.2 lib/

To add networking capabilities to the guest ARM system side and optionally use the same keyboard layout as your host machine, you need to create additional folders in the filesystem:

$ mkdir -p proc sys dev etc etc/init.d

Optionally, create a BusyBox-compatible keymap, in the filesystem, from the currently loaded keymap of your host:

$ sudo busybox dumpkmap > etc/host.kmap

The default initialization script that BusyBox searches for is /etc/init.d/rcS. Instead of using inittab, this is the preferred method to initialize an embedded system based on BusyBox. Create the rcS script as follows:

$ cat > ./etc/init.d/rcS << EOF
#!/bin/sh

# Mount the /proc and /sys filesystems
mount -t proc none /proc
mount -t sysfs none /sys

# Populate /dev
/sbin/mdev -s

# Enable the localhost interface
ifconfig lo up

# Manually configure the eth0 interface. Note that QEMU has a built-in 
# DHCP server that assigns addresses to the hosts starting from 10.0.2.15.
ifconfig eth0 10.0.2.15 netmask 255.255.255.0
route add default gw 10.0.2.1

# Comment this line if changing your keyboard layout is not needed
loadkmap < /etc/host.kmap
EOF

Add executable permission to the rcS script:

$ chmod +x etc/init.d/rcS

Create a compressed filesystem image:

$ find . | cpio -o --format=newc | gzip > ../../rootfs.img.gz

Running and debugging ARM applications

QEMU has all required components prepared (a compressed kernel image and a customized compressed filesystem image) and is ready to run the embedded ARM system.

Run the platform with the following command:

$ cd ~/dev-embedded/ctool-ng
$ ./qemu-0.14.1/arm-softmmu/qemu-system-arm -M versatilepb -m 128M -kernel ./linux-3.2/arch/arm/boot/zImage -initrd ./rootfs.img.gz -append "root=/dev/ram rdinit=/sbin/init" -redir tcp:65000::65000

The redir option will redirect any TCP communication from port 65000 of host system to port 65000 of the guest ARM system. This arbitrarily unused port number is chosen for testing purposes.

The ARM system will boot in a QEMU window then displays the message Please press Enter to activate this console. Press enter and you should be presented with an interactive shell. Start the debugging server as follows:

$ gdbserver --multi localhost:65000

Open a new terminal window, and install the ddd debugger:

$ sudo apt-get install ddd

Edit a configuration file, for example exec-commands.dbg, using the following commands:

$ cd ~/dev-embedded/ctool-ng
$ cat > ./exec-commands.dbg << EOF 
set solib-absolute-prefix nonexistantpath
set solib-search-path $HOME/x-tools/arm-unknown-linux-gnueabi/arm-unknown-linux-gnueabi/
file ./hello-2.7/src/hello
target extended-remote localhost:65000
set remote exec-file /usr/bin/hello
break main
run
EOF

Run the ddd debugger as follows:

$ export PATH=$PATH:$HOME/x-tools/arm-unknown-linux-gnueabi/bin
$ ddd --debugger arm-unknown-linux-gnueabi-gdb -x exec-commands.dbg

You should see a breakpoint in the main function in hello.c file.

Dual boot Windows 7 Starter and Ubuntu

Recent netbooks come pre-installed with Windows 7 starter and support booting from USB/Removable storage devices. This tutorial describes the additional steps to dual boot with Ubuntu (10.04 or higher) and to tweak Grub2 configuration.

Prerequisites

The minimum requirements are:

    • BIOS support for booting from any removable devices.
    • USB flash drive with at least 2 Go of storage space.
    • Internet connexion.

In the next sections, I assure that your BIOS boot order is configured to try Removable Devices first (You need to enter the BIOS setup utility, locate and navigate to the Boot Order options then make and save changes).

Hard disk setup

Pre-installed Windows 7 Starter often occupies the entire disk space. That means you are not allowed to make any new partition to install Ubuntu without changing partitions layout. Although, Windows includes a built-in functionality in Disk Management to shrink and expand partitions, I present another method based on open-source tools that can be used for general disk partitioning purposes:

1. Download and install LinuxLive USB Creator.
2. Download the GParted Live iso file.
3. Create a Bootable Flash Drive: Run LinuxLive USB Creator to install the GParted Live on an USB flash drive.
4. Reboot your netbook using the newly created bootable media.
5. Partition your drive by making enough free space for the future Ubuntu installation (You can also create a Data partition for your needs).

Ubuntu installation

The installation requires the following steps:

1. Log on to Windows 7 Starter again, insert the USB flash drive then open Download Ubuntu.
2. Follow the instructions in Burn your CD or create a bootable USB stick section to create an Ubuntu USB flash drive based installer.
3. Reboot your netbook using the newly created bootable media.
4. Install Ubuntu in the free space previously created. At the end of the installation process, let it install GRUB boot loader to the MBR of the disk.

Grub2 tweaks

The purpose is to change the way titles are displayed on the Grub2 menu and to remove unwanted entries.

1. Backup original files.

$ sudo cp /etc/grub.d/10_linux /etc/grub.d/10_linux.bak
$ sudo cp /etc/grub.d/30_os-prober /etc/grub.d/30_os-prober.bak
$ sudo chmod -x /etc/grub.d/*.bak

2. Remove memtest entry.

$ sudo chmod -x /etc/grub.d/20_memtest86+

3. Customize entries.

The /etc/grub.d/40_custom file is used to place custom entries. It also does not get overwritten by Grub updates.

Remove from the file /boot/grub/grub.cfg the lines enclosed by the following delimiters and add them to /etc/grub.d/40_custom (our Windows and Ubuntu installations will likely not change). Rename the title following each menuentry keyword or remove its associated section to reflect your installation.

### BEGIN /etc/grub.d/30_os-prober ###
…
### END /etc/grub.d/30_os-prober ###

Disable automatic detection of installed operating systems.

$ sudo chmod -x /etc/grub.d/30_os-prober

4. Change the Boot Order and Default Timeout.

These parameters can be changed by altering the values of GRUB_DEFAULT and GRUB_TIMEOUT in the /etc/default/grub file.

5. Update the grub and reboot to see the new changes.

$ sudo update-grub && sudo reboot

Tips and Tricks for Ubuntu 11.10 (Oneiric Ocelot)

The Ubuntu 11.10 codenamed Oneiric Ocelot comes with several changes including improvement of Unity, Gnome 3 and a new redesigned Ubuntu Software Center. The connection manager GDM has disappeared and replaced by LightDM. Ubuntu 11.10 uses the Linux kernel 3.0, which brings many improvements, including improved memory management, better support the Btrfs file system and IPv6 and the ability to adjust the screen brightness.

Apply a different keyboard layout to the entire system

If you managed to select the wrong keyboard layout during setup and you have troubles to enter your password each time, you can permanently change the settings as follows:

Edit the file /etc/default/keyboard and change the values to reflect your keyboard layout, for a French keyboard values could be:

XKBMODEL="pc105"
XKBLAYOUT="fr"
XKBVARIANT="latin9"
XKBOPTIONS=""

Open a Terminal (Ctrl+Alt+T) and run

$ sudo dpkg-reconfigure console-setup

Turn on Num lock at startup

LightDM for now has no support to automatically activate NumLock at startup. To solve this, open a Terminal (Ctrl+Alt+T) and run this sequence of commands:

$ sudo apt-get install numlockx
$ echo "greeter-setup-script=/usr/bin/numlockx on" | sudo tee -a /etc/lightdm/lightdm.conf

Disable Guest account

Ubuntu 11.10 ships with the guest account available at the LightDM login screen. The guest account can be disabled as follows:

Edit the /etc/lightdm/lightdm.conf file.

$ sudo vi /etc/lightdm/lightdm.conf

Add the following to the [SeatDefaults] section:

allow-guest=false

To achieve the changes restart the lightdm daemon:

$ sudo restart lightdm

Gnome Shell

Ubuntu 11.10 uses Gnome 3 (based on GTK 3) but the default user interface is Unity. To install Gnome Shell, open a Terminal (Ctrl+Alt+T) and execute:

$ sudo apt-get install gnome-shell

Change Unity 2D Launcher auto-hide behavior

The Unity 2D Launcher auto hides by default in Ubuntu 11.10. To turn off this feature, install dconf-editor:

$ sudo apt-get install dconf-tools

Check unity-2D options with this command:

$ dconf list /com/canonical/unity-2d/launcher/

You will see something like this:

hide-mode
super-key-enable
use-strut

Type in the following command to disable auto-hide:

$ dconf write /com/canonical/unity-2d/launcher/use-strut true

To reenable auto-hide, use this command:

$ dconf write /com/canonical/unity-2d/launcher/use-strut 0

Change icon size in Unity 3D Launcher

Open a Terminal (Ctrl-Alt-T) then install and run the CompizConfig Settings Manager (CCSM) package using the following commands:

$ sudo apt-get install compizconfig-settings-manager
$ ccsm

After launching CCSM, choose Desktop category and make sure that Ubuntu Unity Plugin is enabled by clicking the check box to the left of it. Select the Ubuntu Unity Plugin, click the Experimental tab then adjust the value of Launcher Icon Size by simple scrolling.